Thursday, December 31, 2009

Christmas Wreath Tutorial

I hope everyone had a wonderful Christmas! :) We sure did and I enjoyed being able to spend so much time together as a family. One of the many projects I had wanted to complete this year was a Christmas ball wreath and I LOVE how it turned out!! I took lots of photos while I was creating the wreath and wanted to put together a photo tutorial so I could share it here on my blog.


To start off, you need to purchase a metal wreath frame (mine was $2.47 from the local craft store--remember the bigger it is, the more ornaments it will use) and you will need more ornaments than you think you will...trust me on this one!  I ended up using 2 boxes of ornaments in each color (4 boxes of 24 total, but I did have leftovers of all colors) and that was mainly because I was doing a pattern with the large and small ornaments in each color. If your ornaments were all the same size, you could use some that had glitter to add an extra accent. I will say to make sure you use the SHATTERPROOF ornaments if you are hanging this wreath on your front door! If it will only be hung inside on a wall for an accent, it probably doesn't matter. I fell in love with some glass ornaments and have had to replace a few because that's what I used for my wreath...lesson learned. I also went back after Christmas and purchased some shatterproof ornaments on clearance so I could make another one for next year in some different colors.  You will also need LOTS of glue sticks and a hot glue gun, some jingle bells, 26 gauge wire and ribbon of your choice.  The jingle bells and ribbon I was able to purchase before Christmas on sale 50% off so I was thrilled!

  Start by laying your first row of ornaments onto the wreath base and hot glue them down. I turned all my ornaments so that the metal hanging tops were face down.


Here is a picture of the underside of the wreath at this point.


Then to add a little stability to this base layer, I used the wire to anchor the hanging tops of each ornament to the wire base. I just basically cut a short piece of wire (3 inches or so) and threaded it through the hanging loop and around the wire base, then twisted it like a bread tie. I did add a little dot of hot glue to the twisted wire to keep it in place.


Once you have finished that step, you are ready to start adding your second layer of ornaments. I started on the outside and created a pattern with my colors, using smaller sized ornaments. Here you can see as I started creating my pattern. All these ornaments were attached with hot glue only.

The next step was to work on the inside edge of the wreath and add your layers there. I created a pattern to follow on the inside using the smaller ornaments as well and glued them all down until I had the basic wreath size I was wanting.

The next step is to fill in the gaps on the top side of the ornaments. Right now, your wreath will be very flat looking with the three rows of ornaments (base, inside and outside rows) and there is still large spaces between the small ornaments. This next set of ornaments will give it more of a full look and create a top layer that will be perfect for the extra embellishments. Here's what it will look like when you are finished with that step.

 Now it's time to add your extra "embellishments". I used silver jingle bells and some loops I created with green wired ribbon.  To make the loops, I cut 4 inches of wired ribbon, then put hot glue on the bottom edge, and folded the ribbon over to create a loop. When that dried, I added glue to half of the bottom edge and folded the ribbon over in half  to make a pleated loop. When this dried, I opened up the loops with my fingers and fluffed them before I glued them into spaces in my wreath. I love the pop of the green color and the jingle bells were added last, filling in any other spaces I had open. This sounds so festive when your door opens and I love the extra sparkle that the bells bring to the wreath.


By the time you get done with all this hot gluing, you will have glue strings coming out from every direction. The easy way to clean most of it up is to pick off the biggest thickest pieces with your hands once it's all dried, then use your heat tool to melt the smallest strings of glue. Be careful to not use your heat gun too long over the surfaces (especially your ribbons), but keep the heat tool moving.

The last step is to use a longer piece of wire to create a hanging loop. I don't have a picture of this step, but I pretty much used a long piece that I doubled back on itself to create a stronger loop, then I twisted it around two points on the metal wreath base to create a loop. I used a wreath hanger to hang it from my door and I'm thrilled with the results! The glass balls really do catch the light all day long and seem to glow...so pretty!


Wishing everyone a Happy New Year!!
Wednesday, December 30, 2009

You Are Loved--12x12 layout

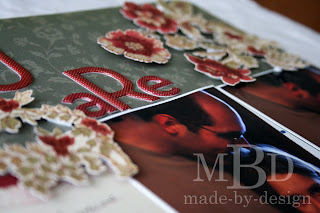
I created a layout last night using a few of my favorite photos from this year. These were taken on Valentine's Day 2009 and I love how I was able to catch some sweet hugs and kisses between my husband and our daughter.


This layout was really fun to make and came together quickly. I used some new Cosmo Cricket paper from the Everafter line for the background and then I used some old Daisy D's paper and hand cut the flowers from the paper and used foam squares to attach them to my layout. The journaling paper is from Making Memories (Paperie Rouge) along with the Puffy Alphabet stickers. The bottom layer of floral paper was also cut from the same Daisy D's paper and I used a scallop border punch from EK Success to give it a softer edge. The corners of the layout were punched with the WeR Memory Keepers corner chomper.  My husband wrote a sweet note to our daughter on the journaling notebook page and I included it to the left of the photos. Here are some more detail photos.


Monday, December 21, 2009

Cards made from scraps

Here are some cards I made from the same scrap paper technique I highlighted in an earlier post on my blog.
I loved the mix of the patterns once they were cut and adhered to the putty colored strip and was inspired to create some quick Christmas cards. These cards are also featured on the Scrap Our Stash Challenge blog today.

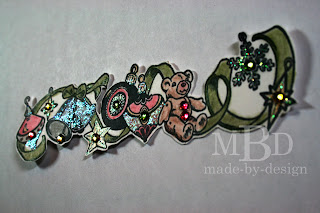
The first one uses a small section of the paper strips and a couple of different stamps. The angel was stamped directly onto the black card base with versamark ink and heat embossed with clear powder. The stamp "Merry Christmas" was also stamped with versamark. I sprinkled some Heat and Stick powder onto the sticky ink, and heat set it quickly to melt the powder, then sprinkled on some black glitter and heat set it again. The top corner was rounded with a corner rounder to finish off the card.


The next card used a kraft colored card base to warm up the card and I hand cut some holly leaves from the left over green paper scraps. The red berries were punched with the larger end of my Crop-a-dile and I adhered the leaves and berries to the card with foam tape, then added diamond stickles to accent them. The saying was stamped with black ink directly onto the putty colored strip of paper that held the pattern papers.


Again, this is a fun way to use up your scraps! :)

Tuesday, December 15, 2009

Some money saving tips

I love to repurpose things and save some money at the same time! :)  One item I found at the Dollar Store was these large yellow sponges in the car washing section.


I cut the large sponge into small pieces and have quite a few small sponges to use with my different stamping inks to distress the edges. MUCH cheaper than buying the yellow round sponges and cutting them up into only 4 pieces. All these sponges pictured below (24 pieces) were from one large sponge.

To use the sponges, just pinch the sponge together on one end and dip it into your inkpad and flick or sponge the color along the edges of your image or cardstock. You can't beat 24 sponges for only $1!


Another idea is to use wood stamp blocks to create your own ink blending tools. I have two Ranger blending tools made by Tim Holtz and love them, but wanted a few more so I could use multiple colors at one time without having to stop and change the foam pieces out all the time. The blue side of the foam is what sticks to the velcro on the block. These tools can also be used with the Ranger felt pieces with alcohol inks.


So I used some blocks that left over from when I unmounted my wood stamps and stapled the scratchy side of some velcro to the bottom of the blocks.


I'm not too worried if the block isn't the same size as the foam pads, they still work fine. And I don't use the handle part of the Ranger tool, so this made sense to me to just use the stamp blocks without creating a handle. The velcro was sticky backed, and I just used the staples from the staple gun to reinforce the velcro on the block. And to not waste any of the velcro, I actually pieced it together on a few of the blocks.


Works great and is a neat way to repurpose the blocks I was no longer needing. The cost for this project was just one pack of the industrial strength sticky velcro for $3.29 regular price at my local Hobby Lobby (and I used a 40% off coupon, so I saved even more).

Hope you can use these ideas to repurpose and reuse your supplies around the house!

Friday, December 11, 2009

Frugal Friday tip: Custom Colored Gems and Pearls


Do you ever run out of the right color of gems or pearls when working on a project? I have and one of my favorite tips is to just buy the clear gemstones and white pearls and then custom color them with permanent markers.

Sharpie makes quite a variety of colors to choose from, and the Bic Mark It brand has the bonus of being acid free!
 
To begin, you just color a number of gems while they are on the storage sheet. To get in between the gems or pearls, you can bend the sheet or cut the amount of gems you'll need for your project off the backer sheet and color them separately.These gems and pearls have a line of adhesive underneath them, so you just make sure you cut through the adhesive layer too, so they are easy to stick to your project later.


To use the gems individually, just cut between two gems with an exacto knife, making sure your cut goes all the way through the adhesive layer. Then you can use the exacto knife to pick up the gem and place it down onto your project. When you have the gem in place, use your finger to press it down firmly and gently remove the exacto knife at the same time with your other hand.


Now that you know how to color and place your gems and pearls, let's back up a step. To create your stamped image for this card, ink the stamp in Pine Needles Distress Ink, then flip your stamp over so you see the rubber image side.


Now take a black marker and use the brush tip to color over the green ink by following the outline along the outer edge.

When you stamp the image, it will have two tones--black and green. Cut around the stamped image leaving a small white border. We'll add the "berries" to the image next with the red gems.
 
 
To add a little 3-D gloss to the leaves, use some Glossy Accents from Ranger and liberally coat the leaves with the glue. When this liquid goes on the image initially it will appear slightly milky in color, but it dries completely clear and with a cool glassy raised effect.
 

Now we'll add some color to the edges with a sponge and a brown inkpad (Brushed Corduroy). Just dip the sponge into the ink and flick the edges of the stamped image. The more you go over an area, the darker it will be.

This is what it should look like when you are done with this step:


To complete the 3x3 card, stamp your "Merry Christmas" sentiment on the brown cardstock with black ink. This layer will be glued to the bottom of the card, then add some matching pattern paper along the top. Both of these layers have been sponged with black ink along the edges.
 
The holly berry image is adhered to the card with foam tape, and a layer of stickles glitter glue is added around the border just inside the black outline. Stickles were also added to the black line under the saying along with a red gem.  These little 3x3 cards are the perfect size for gift tags or quick notes.


You don't have to stick with one color of gemstones or pearls on your project. For this next card, I used several colors (yellow, green, red) for my gemstones.


The stamped image was colored with colored pencils, then blended with gamsol (odorless mineral spirits) and a paper blending stump. I added the gemstones in the centers of the images or where a dot would have been in the image. The other areas were also highlighted with some stickles glitter glue for more sparkle.
 

I cut around the stamped image, layered it onto a black piece of cardstock, then punched the bottom edge with a border punch, and rounded the top edge with my corner rounder. The red ribbon was tied around the black cardstock layer along the top, then that whole layer was attached to the white card base with foam tape. "Merry Christmas" saying was stamped underneath this layer and a red gem was added to the center of the line. The bottom edges of the white card base were also rounded with my corner rounder.

The last card uses the same concept, but instead of using gemstones, I used pearls in two sizes and colored them in red and green and also used some as plain white.

 
This card was also pretty easy to create. The reindeer stamp was stamped with brown chalk ink, then I added my colored pearls to the image and cut around the image closely. I used foam tape to adhere the reindeer to the green layer of cardstock, then drew faux stitch marks with a white pen. I also used the same border punch to create a frame for the top and bottom of the mounted image, and added a row of stickles glitter at the intersection of the green and red paper layers. Stickles were also added at various places on the main stamped image for extra glitter.

I hope you will enjoy creating your own custom colored bling!