Friday, July 30, 2010

Layout Share: We are Family

This is another layout created with the supplies I received for the Memorable Seasons DT.

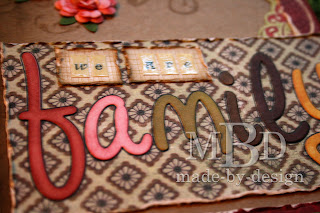
For my title, I used the mini alphabets and placed them onto small rectangles that I distressed with my fingernail and inked to add depth. I also applied some glossy accents to the letter stickers to help them stand out a bit more.  The word "family" was created with the monogram stickers that I outlined with a black pen. The colors on these monogram stickers were a bit flat, so I used similarly colored ink pads to add some dimension to the edges with a sponge.

I hand cut the green and red border pattern from one of the pattern papers. This added some pop of color without being too overwhelming and I really loved the texture the pattern added to my page.

For my journaling section, I stamped the scallop rectangle image onto the same pattern paper I used for my mini alphabet letters in my title. I cut around the stamped image and inked the edges then glued it to my page.

This was one of my favorite parts to create on the whole layout! I wanted to mimic the same swirled and floral pattern that was on the red background paper, so I stamped some swirl images with clear ink onto the kraft card stock. Then I hand cut one of the butterflies from a scrap of the red paper, and added some glossy accents to the butterfly body which was then mounted with foam squares. 

For the flowers, the red color matched perfectly, but the pink flowers were actually white ones that I colored with a pink ink pad. All of the layers for these flowers were sprayed with Glimmer Mist. To create the flowers, I used 4-5 of the mini Prima flowers. Each layer of flower has liquid glue in the center, and you just scrunch up the flower starting with the center and adding the layers as you go. This is a great way to use up all those little tiny flowers that were sold in jars by the hundreds! :)
For the leaves, I used a flower punch and punched one flower from the green card stock, then cut it into thirds with two petals still connected on each section. This gave me three sets of leaves. Quick and easy!
 On the red pattern paper, I wanted to accent the butterflies and the printed roses, so I added some glossy accents to the butterfly bodies and used a paintbrush to add some glimmer mist to the printed flowers. Very subtle but I love these details!
Fired Brick, Peeled Paint, Wild Honey
Prima mini flowers (red and white--inked to create pink)
EK Success Flower Punch (cut green cardstock, then trimmed to create leaves)
Kraft Cardstock
Ranger Glossy Accents
Tattered Angels Glimmer Mist (Pearl)
Black Pen

* Product I received with the Memorable Seasons DT kit.
All other products were from my personal stash.
Thursday, July 29, 2010

Layout Share and sketch: Bluebonnets

This was the July Sketch designed for Memorable Seasons by Cheri O'Neill (Let's Scrap).

And here's what I did with the sketch:
For my title, I used the mini monogram stickers and placed them on my layout, then outlined them with a black pen for emphasis.
I used a large scallop border punch and inked the edges of the scallops to mimic the zig zag pattern from the sketch.
Instead of using a star accent, I added a bow on top of the pom pom ribbon. I also layered some of the paper doilies underneath to tie it all together.
My journaling is written on the artistic paper and I love that the bottom edge was already pre-printed. I just inked the edges of the rectangle and added my words. The half-circle on the left of the journaling matches the scallop border on the top of the layout and adds some blue color to my page.

*Products I received with the Design Team kit from Memorable Seasons.
All other products used were from my personal stash.

Like a kid in a candy store...

I was SO excited when Jill let us pick our own papers for this month's Design Team kit for Memorable Seasons. I used to teach scrapbook classes and my FAVORITE part was walking around the store mixing and matching different papers, patterns and textures. These papers really fit my personality and have a vintage feel to them. Even better is that most of my papers were on sale!

I can't do anything by the "rules" so I challenged myself to just pick out patterns that I loved no matter who the manufacturer was or what collection it came from and to mix them in an eclectic way. I LOVE how these papers turned out together in person...you never know sometimes, right?

Jill paired my papers with some awesome monogram stickers, Bazzill dotted swiss card stock, some pom pom ribbon, buttons, pearls, an awesome Unity stamp, some brads, mini alphabet stickers, and a roll of ribbon doilies.
Here's everything together...let's just say I felt like a kid at Christmas when my box arrived! 

I will be posting the layouts and cards I've created with this kit over the next several posts.


Wednesday, July 21, 2010

Final week's challenge: Last Scrapper Standing

This is the final week of the Last Scrapper Standing challenge over at Memorable Seasons. It's my turn to host the challenge and I wanted to open it up to anyone interested...Jill will be giving away a gift certificate to her online store (Memorable Seasons) to one participant this week!

Here's the challenge:
Each participant must use at least 3 different stamps in 3 different ways on your layout. Any number of alphabet stamps used as your title all count together as a single stamp and a single use. If you stamp your title (no matter how long it is), you will have to come up with two other ways to use two different stamps on your layout. Choice of stamps and layout subject is up to participants. You can add any number of pattern papers or card stock to your layouts along with using more than 3 stamps, but must have at least 3 different stamps used in 3 different ways.


For my sample, I used stamps in these 3 ways:
1. Border--Circle stamps (stamped in a row as a brown border onto pattern paper) along with smaller dotted circle stamped in blue inside some of the brown circles; blue and yellow borders (stamped onto ledger paper as border accents)

2. Title --used 2 different alphabets to create my title (word "butterscotch" was stamped on pattern paper and cut out, the words "ice cream" were stamped directly onto the pattern paper) but both sets only count as one use.

3. Embellishment--100% Circle (stamped this circle image onto cream paper, then cut out with circle cutter and matted with pattern paper)

So I used at least 3 different stamps (actually used more--7 different stamps in all) in 3 different ways .

The Design Team will be voting again this week and we will be crowning one member with the title of Last Scrapper Standing and that person will also win the grand prize. We will announce the winner as soon as our votes are all tallied, so be sure to check back often. A random winner will also be chosen from among all the other entries (those playing along for fun).

I can't wait to see what everyone does with this last challenge!

Supplies Used:
*Basic Grey Oliver Buttons
The Paper Studio--Vintage Ledger Pattern Paper
Dark Brown Cardstock (Archivers)
Making Memories Pewter Brads
Wendi Speciale Designs (100% stamp)
Technique Tuesday alphabet (Big Timber)
Making Memories alphabet (Classic Mixed)
Fancy Pants (blue and yellow stamped border accents)
Martha Stewart (Dotted Circle-stamped in blue ink on circle border)
Colorbox Chestnut Roan Fluid Chalk Inkpad
Ranger Distress Inkpad: Wild Honey, Chipped Sapphire
Creative Memories Circle Cutter System
Tan crochet thread
*These supplies came from the Memorable Seasons DT Kit for July. 
All other supplies used were from my personal stash.

Wednesday, July 14, 2010

Family Time Together...layout share

For June, Jill sent the Memorable Seasons Design Team the Fancy Pants "Like Father Like Son" Collection. I absolutely LOVE the patterns and colors on these papers. Here is the first layout I completed:
I used the background paper "as-is" and added some personality to it. :)
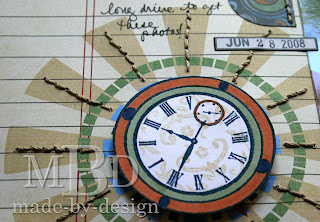
 The patterns printed on the paper were perfect for nesting several photos in a column. I ended up stamping some clocks and coloring them with markers to further fit my page theme of Family Time Together. I cut the clocks out and mounted them to the center of the three largest circles, covering up the large stars. I also stamped a tan scroll image in the center of each clock.
For the title, I used the kraft colored tickets and colored them with markers to match.The smaller ticket already had the word "together" printed on it, so I just used my stamps and added the words "Family time" to the larger ticket. These are also mounted to the layout with foam tape. You can also see part of the blue scalloped sticker border I cut into two pieces to nest on each side of the photo column.
Here is the other side of the scallop border. I added some hand-stitching to various parts of the layout to give those premade embellishments some character. The small label stickers were stamped with small sayings and black StazOn ink.
This picture shows some more of the hand-stitching I did around the three clocks. Each clock is bordered in a different way. I used tan embroidery thread and a large needle to add this detail.

Supplies Used:
*Fancy Pants Like Father Like Son Collection:
*-MVP
*-Elements Stickers
*Maya Road Kraft Mini Tickets
*7 Gypsies Mini Label Stickers-Naked Color
The Girl's Paperie: Paper Girl Stamp set (clock and flourish stamps)
Technique Tuesday stamps: "family"word on ticket and sayings on labels
Art Warehouse: "time"word stamp on ticket
Date stamp
Tsukineko StazOn Black inkpad
Ranger Distress Inkpad: Antique Linen
CTMH inkpads and markers: Outdoor Denim, Autumn Terracotta, Garden Green
Staedtler Marker: Delft Blue
White cardstock, Tan embroidery floss, Foam Squares

* These products were received as part of the Memorable Seasons Design Team Kit.
All the other products listed were from my personal stash.

Tuesday, July 13, 2010

Last Scrapper Standing...Week 4

I was finally able to get a layout completed for the Memorable Seasons contest this week... it's been a busy summer! :)

The challenge for this past week was from Jude and she challenged us to use household items to create a background (using ink, paint, etc). I used a plastic canvas, a decorative lid from a glass jar, and a pencil eraser.
To create the grid pattern on the white card stock, I used a plastic canvas and inked it with a green inkpad.
Then I "stamped" it down onto the white card stock and used my brayer to transfer the ink.
Here's the cool pattern it made:
Then I trimmed the paper down and rounded the corners, and inked the edges with a red inkpad and a sponge.
To create the pattern background on the blue card stock, I used a printed decorative lid on a glass jar and a pencil eraser.
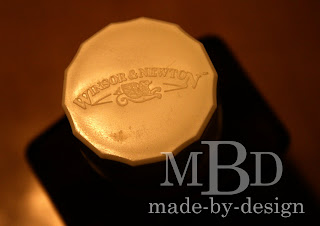
Here's a picture of the lid I used:
It was from a jar of Gum Arabic I had in my craft room. I stamped the lid pattern onto the blue card stock with a clear Versamark inkpad, then sprinkled it with clear embossing powder and heat set it.
To fill in the gaps, I used a pencil eraser and a white inkpad. The small dots are really subtle, but create a unique pattern when paired with the larger lid stamped images.
Here you can see the two patterns I created with these household items:
To finish off the layout, I added some buttons and felt alphabet stickers. My journaling was written on the back of a coordinating pattern from the same line of paper.

Supplies Used:
Studio Calico Anthology line:
-Compilation
-Aperture
Blue, white and craft card stock
American Craft Thickers- Red Playroom felt alphabet
WRMK Corner Chomper
Ranger Distress Inks: Fired Brick, Peeled Paint
Tsukineko InkPads: VersaMagic Cloud White chalk inkpad, Versamark Inkpad
Clear Embossing Powder and heat tool
Buttons and white embroidery thread
Pencil Eraser, Plastic Canvas, Decorative lid from glass jar

All supplies were from my personal scrapbook stash.